The Pikler Triangle – an interesting creation and one of many physical toys you see in the occasional Montessori Space. Much like the Rainbow Rocker, or a rocking boat, the Pikler Triangle is a contraption encouraging gross motor skills and free play. At most, it’s just a climbing frame. In a moment of mom, I decided we needed one and that I could build a non-folding Pikler Triangle for my 8.5 month old son.
I figured I could easily make one. I passed wood working in Middle School. That makes me qualified, right? I could totally do this.
And, if I failed, at least my brother-in-law had a woodworking shop, and could totally help/take over the project. Or maybe my husband would help me out. I knew I had to at very least start the project to get it finished.
You Might Also Like – BrainRichKids Indoor Play Gym
This post contains affiliate links, which means that if you click on one of the product links, I might receive compensation.
Don’t want to make one? Check out where to buy a pikler Triangle or wooden climber here.

Inspiration
Originally, I downloaded the plans for the wildly popular Foldable Pikler Triangle. However, after reading thru this beginner wood worker (if you could even call me that) had no clue what any of the parts are and struggled to conceive we’d ever successfully build that.
My husband insisted I download a picture before meeting my brother-in-law at the lumber yard, and I downloaded a much simpler version. We decided we’d do that instead.
So,without a plan, just a picture and me trying to relay my future vision to the boys, we went ahead on our project.
This is our journey in building our Pikler Triangle, and perhaps this can either encourage you to do it yourself, or discourage you and tell you to just buy one. I also hope that this provides you with insight to some of our blunders and learning curves to help you in knowing what to do.
Please note: This tutorial is for the non-woodworking readers. It’s for the average parent who has no idea about the technical terms or specifics involved. This tutorial is to give you the gist of how you might tackle such a project. I strongly suggest someone help you, or you watch additional YouTube Videos. I am just a novice mom is trying her best to explain our process of building a Pikler Triangle.
The Gist
It’s just a triangle climbing frame. Pretty simple stuff really – you need two triangles (the support) and then some bars (for climbing).
Cost: ~$125 (more if go with quality wood and less if you have the stuff already)
Time: 8 Hours of labour? There was a lot of putting around on other projects
Skill level: Intermediate
Or find out where to buy one for about double to triple the cost.
Important Stuff to Think About
Safety – Lets think about the space between the bars and what might hurt your child, kill them or just be unsafe. Some comments online suggest a minimum of 3 1/4 “, the foldable DIY one listed above is 5” apart with total gap of 4”. Just think about it, and make a safe decision for you and your family.
I’ll be honest. The boys didn’t think about that and just evenly spaced the bars. That’s why I bring it up.
Height – How high do you want the Piker Triangle?
Our wood is 3 feet on the outer edge of the triangle, that really only gave us a height of 2 1/2 feet. Nothing. I would have ideally like a little more height and maybe have gone for a 4’ triangle.
Space – Do you care how big the Pikler Triangle is? Do you care if it collapses?
Collapsing makes for more parts, pieces, skills and expense. I decided that I’d never collapse it and put it away. Instead. I have come to terms that it will forever be furniture in my home. Thankfully, it’s beautiful. We also have plans for multiple play spaces. Eventually it will just live downstairs. It is also easy and light to carry for maneuvering.
Width – Will the triangle need to fit thru door ways? Ours JUST does. It also doesn’t fit thru some of the narrower doors upstairs so it’s stuck in the living room and can’t be moved to his play room.
Materials
Now that you know how high you want it, how far you want the bars spaced, its probably best to draw a diagram. This will help you articulate your plan to anyone who helps you with the project and maybe takes it over. Best bet is to check out your local hardware store for all these supplies <3
- 3’ Dowels larger than 1” diameter – you’ll need as many indicated by your diagram. We had 13 total, and our triangle was too small for so many (9 would have sufficed)We used dowels that were sturdy but cheap. The ones close to 1” were the most expensive, so ours are about 1 5/16”. It cost us about $1.69/ft (the smaller ones were $2.29/ft). Ask the hardware store to cut them for you. Makes it easier to bring home. Also inspect the dowels. Its not fun if you need to sand too much.


- 2×4 (or like) wood – you’ll need 6 pieces of equal size to make a triangleWe just used whatever my brother in law had in his shop. This worked out to be 3-3’ pieces (x2 triangles) = 18’ of wood.
- Wood Glue and/or screws
- Sandpaper
- Bees Wax or Polyurethane or other finish.
Process
I’m no wood worker, and because I didn’t spend the majority of the time on the project (had to put the baby down for a nap), I’m just going to guide you thru our process to help you in you creative DIY process of making your own Pikler Triangle.
-
- Cut Wood for TrianglesThe boys cut the 2×4 into 3 foot pieces along each side. They wood was cut on a an angle so it would wedge together into a triangle shape /\. The wood was sliced in 1/2 at the top so it could slide together (much as you’d imagine holding hands – that’s non-wood working lingo).If your dowel isn’t cut, cut it now. You can also ensure it’s all equally 3 feet long at this point.
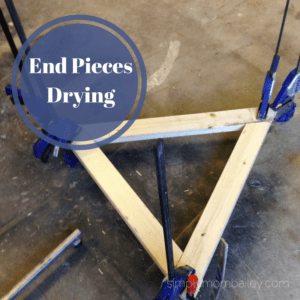
- Glue/Screw Wood together.Wood Glue was used to create the triangles. They nestled the wood together, glued it and then clamped and let it dry, about an hour before drilling holes, and it sat for a couple days before the project was finished (work stuff).
- Sand Dowels.I’m forever grateful my BIL has a lathe. I got to sand the dowels down with 150 grit paper on the lathe. Sanding has never been so easy. #knowingtherightpeople
Purchasing higher quality dowels might help remove this problem.
– Heads up the person who took this photo, also took twenty minutes to take him from me and play with him. A woodshed is not a safe place for a baby.
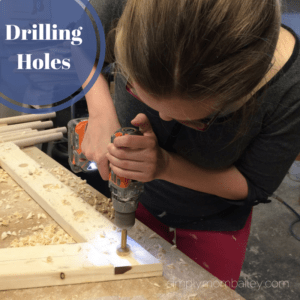
- Measure Holes Using your predetermined to width of the bars, and a measuring tape. Mark the centres for the holes along your wood. This is important and should be as accurate and precise as you can make it.
- Drill HolesThis is my FAVOURITE part! Why? Because I really really wanted to use the Fostner bit to drill the half holes into the wood. I remember doing this in wood class and thinking it was cool. Luckily, I did mostly all of them. I only messed up one (chipped up some wood).
- Make Dowels Fit in HolesNaturally not every dowel is the same exact size. Eric spent one afternoon just chipping and sanding the downs to fit in the holes. He said this process took time. I didn’t actually get to see it in action.

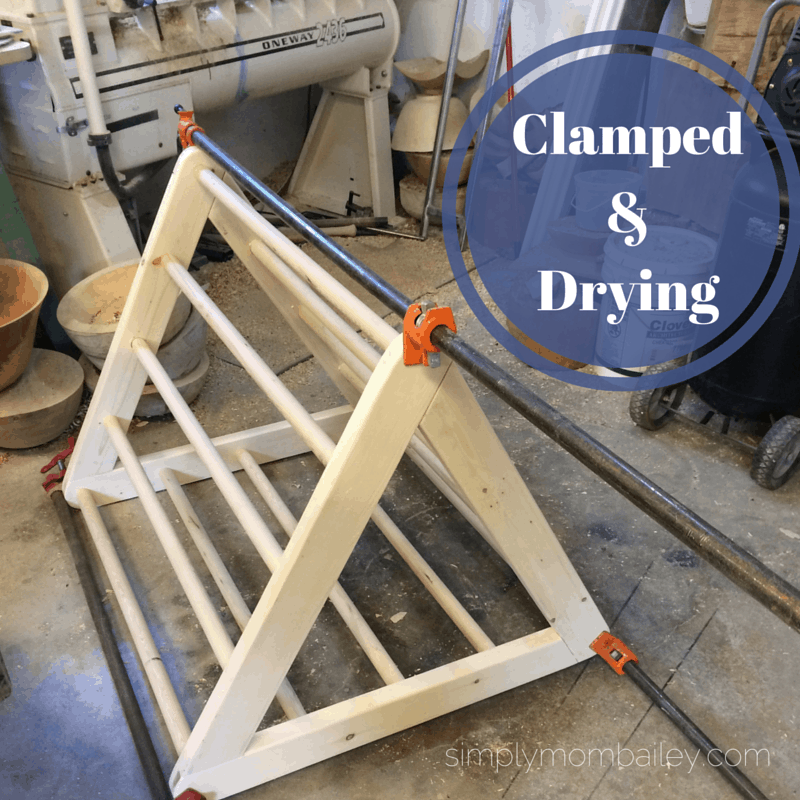
- Glue Dowels into Holes (& then the dowels were clamped with large bar clamps and allowed to dry). My brother in law the woodworker deemed this to be sufficient, as there was talk of screwing in place.

- FinishThe triangle was sanded down and then rubbed down with food grade bees wax (something like this product – affiliate link). My BIL said this was easier than polyurethane and maybe more kid friendly. It provides a beautiful silky smooth coating and only took eric an hour or two to accomplish.
- Bring Project HomeWe made the triangle at my BIL shop. Luckily he has a truck because it wasn’t fitting in our hatchback. Luckily, it also fit in the house. #thingstothinkabout.


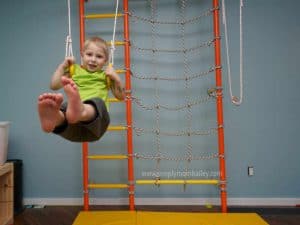
Playtime with our Pikler Triangle
Walter is 9 months. Walter knows how to crawl and has been crawling for over 3 months. He loves to stand and he loves to push things and walk with it. He is always on the go, and has most interested in developing is gross-motor skills.
You can also check out how to buy one here.
 Over the past week, he has shown some interest. He uses it as an obstacle to crawl around. He does stand on it and shimmy back and forth. He can climb up one rung and then fall back down. He will get it one day. <3
Recommendations: place the Pikler triangle on a mat or a rug. Walter will shake the triangle if it is not on a mat or a rug. Walter can also push it since it is fairly light. A mat or a rug can also help with tumbles.
NEVER LEAVE A CHILD UNSUPERVISED WITH THE TRIANGLE. ADULT SUPERVISION REQUIRED.
Thanks for reading, I hope this provides some insight for you on building your next project. Honest, my recommendation would be to build a rocking boat/stairs (or maybe just buy one, like this crazy priced one off amazon – affiliate link. I think its probably safer and more fun. Maybe that’ll be our next project. (Afterall, downstairs will be turned into a fun kid play space)
PS – If you make one, share it with me! I’d love to see and hear your adventures in this project.


Thanks for posting this! I definitely want to try it!
Thank you SOoooo much for this! I desperately want to make a few things for my (6months today?) grandson but have limited skills & funds. This is perfect. With arthritic hands it will orobably take me more than 8 hours but it will be done.
Hours of fun nd some happy memories ahead. Very grateful for the time you took to detail your journey.
Warm regards Leigh
Great write up. Encouraging for other non-wood workers such as us. 🙂
THIS was the tutorial that I needed ?? THANK YOU!!